
Blog
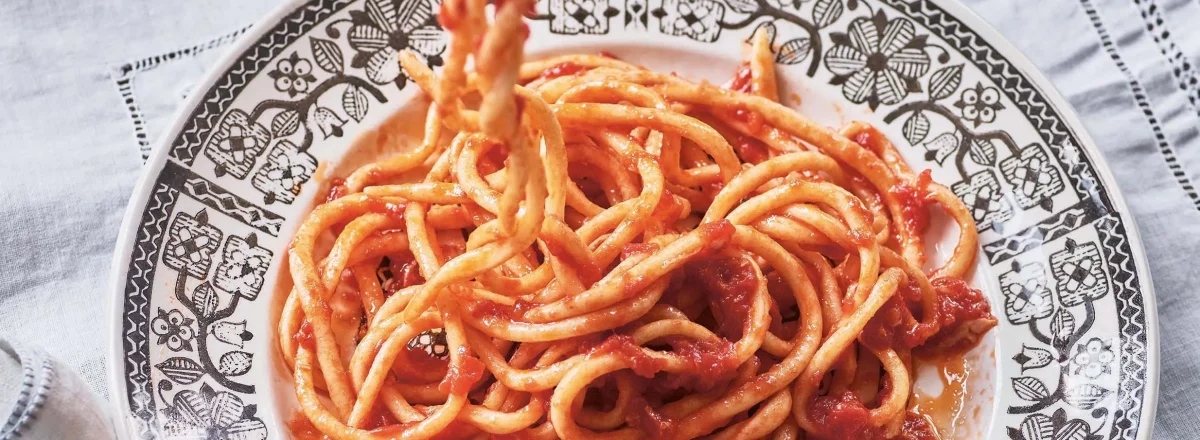
Guiseppina's Pici with Garlic Tomato Sauce
The sauce has to simmer for a couple of hours, so start this before your pasta. Pour the olive oil into a small saucepan – it should cover the base to a depth of 5 mm (1/4 in). Warm up the oil over a low heat and sauté the whole garlic cloves until you can crush them with a spoon; they shouldn’t burn. This will take about 20 minutes.
Step 2
About 15 minutes into the cooking, add the chilli pepper, and continue frying the two ingredients for the final 5 minutes. Stir through the tomato purée, followed by the plum tomatoes. Break up the tomatoes with a wooden spoon, season with salt, and add half a tin of water.
Step 3
Let this simmer very gently over a low heat for 2 hours, adding a splash of water from time to time if you need to. You want a thick sauce at the end. Giuseppina uses a food mill to purée the sauce – to make sure the garlic and chilli disappear. You could also use a hand-held blender.
Step 4
Make the pasta dough as described in the Egg Pasta Dough Recipe below.
Step 5
To shape the pasta: Roll the dough out quite thickly, about 5 mm (1/4 in). Then slice it up, making 1 x 12 cm (1/2 x 5 in) batons. Take each one, place it on the board and place both your hands together over the pasta. Keep your fingers straight and roll out the pasta, moving your hands apart. You are creating a spaghetti strand, so try and keep the pasta even in thickness. Giuseppina’s pici are much slimmer than some of the tubby versions you see on the Internet; aim for about 3 mm in diameter and 40 cm (15 3/4 in) long.
Step 6
Drop your finished pici into the semolina. If the bowl starts getting a little crowded, move them onto a tray.
Step 7
Bring a large pan of salted water to the boil and drop the pici in. Cook for 2 minutes and then test for doneness. Drain and stir through the sauce – you want it to cling to the pasta and not puddle around it. Serve immediately. Traditionally, no cheese is added.
Step 8
To make the pasta dough: Fill a shallow bowl with semolina flour to drop your pici into, to stop them from sticking together. Place a small bowl of water to the side of your pasta board, so you can keep your fingers moist while rolling the dough into pici (or use a small spritzing bottle filled with water).
Step 9
Tip the flour onto your board in a heap. Use your fingers to make a well in the centre, making sure it’s not too wide or the rim too low, otherwise your egg mix will overflow.
Step 10
Pour the eggs into the well. Take a fork (or use your fingers) and scramble the eggs together. They are mixed sufficiently when you lift the fork and you have a homogeneous, non-clumpy looking liquid that falls smoothly from your fork.
Step 11
Draw your fork round the inside of the flour wall, so a small quantity of flour falls into the egg mixture. Whisk it in, smooshing any lumps, so you gradually create a batter. Repeat until you have a mixture that won’t run all over the board. At this point you can cave in the flour walls and mix in the rest of the flour with a bench scraper by scraping the flour inwards and over the batter. Of course, you can beat the egg and flour together in a bowl, even with a food mixer, but it’s not as fun.
Step 12
Mop up any flour with your dough and give it a quick knead. If it is sticky, add a tablespoon of flour and knead it in. It is better to adjust your dough now than later.
Step 13
If it is not sticky and you have some flour on the board, scrape off the excess, so you have a nice clean board to knead your dough. Nonne sieve any excess flour and reuse it.
Step 14
The dough should feel soft and pillowy, but not too sticky.
Step 15
Knead the dough for 10 minutes minimum. Think of your hands as waves: the heels of your hands push the dough away from you, while your fingers pull it back. Once your dough has become a log, turn it 90-degrees and fold it half and continue kneading. You want to work at a brisk pace, as air is the enemy of decent pasta – it will dry it out, so don’t dawdle. If the pasta feels too dry, damp your hands with water to put moisture back into the dough.
Step 16
Kneading develops the gluten and elasticity of the dough. Your dough should feel silky and smooth. When you press your thumb into the dough, it should bounce back. Some nonne judge their dough to be done when they can see small holes in the dough if sliced through the middle. To knead, you can also use a dough hook on your food mixer.
Step 17
At this point, place the dough in a lidded bowl and cover it to stop it from drying out. Cling film (plastic wrap) is good too, but you may not want to use it. You can also use a tea towel, but it’s important it hasn’t been washed with perfumed detergent as this will add an odour to your pasta. Leave the dough at room temperature for 30 minutes. This relaxes the gluten and makes it easier to roll out.
Step 18
You can also leave it in the fridge overnight. The colour will darken, but it will taste the same. It’s important to bring the pasta back to room temperature before you try rolling it.
Step 19
Before you start, remember to keep your pasta floured throughout the process.
Step 20
Cup your hands over your rolling pin so your wrists nearly touch the pasta board. Flatten your dough with your pin, turning it a few degrees at a time in the same direction; this helps to keep it circular.
Step 21
When it is the size of a plate, start with your hands at hip width and roll the top third of your dough (furthest away from you) by following the curve of the circle and drawing your hands inwards as you push the pin away from you. Your hands will meet in the middle. Stop the pin before it reaches the very edge. Roll the dough four times.
Step 22
Turn the pasta from 12 to one and repeat going round the clock.
Step 23
You will end up with a bump of pasta in the middle. To get rid of it, flip the outer edge of pasta over the pin. Hold the pasta with one hand, and place the other hand on the dough to stop it moving. Give the pin a tug with the pasta hand to create a snug fit around the pin. Roll the dough over the pin towards you.
Step 24
Move your hands wider, stick your elbows out and, pressing down, roll the pasta out two or three times. This will flatten the thicker central zone of your pasta. Finish with the pasta rolled up and turn it 90 degrees, opening it out across the board.
Step 25
Refer to the instructions above to create the pici shape from the sfoglia of pasta dough you’ve rolled out.